Showing posts with label #Crispy. Show all posts

Sunday 13 June 2021

Capsicum Rings || Kids friendly Italian flavored capsicum rings

 Capsicum Rings || Kids friendly yummy snack capsicum rings, this is very crispy and super tasty snack with Italian flavors. This is very easy to prepare snack item that stay crispy for long time. I prepared these capsicum rings without using maida and by adding Italian seasonings like oregano, mixed herbs and piri piri mix, its interesting right? Perfect as tea time snack, as starter for kitty parties, for kids functions, for get togethers and for many occasions.  We prepare many fritters like baby corn frittersgobi pakoda/ cauliflower frittersraw banana fritters, Jack fruit masala vadavamu akku bajjichoor puggi/ Rayalsema pugyalu is one of my favorite street food @Adoni my hometown, stuffed mirchi bajji / mirapakaya bajji is other favorite street food @Tenali my in laws place. Poha chivda(video) is one of my favorite snack from my childhood, surely it is one of your favorite snack right??


    Ribbonn murukku(video), Omapodi / Sevidalmoth namkeenspicy masala peanutsRoasted masala chickpeaspepper sevboiled masala peanuts are some popular snacks that we love to have at evening tea time snack. We love to have BhakarwadiGujarati methi masala khakhara in our North Indian bakeries. Potato lollipops(video), spicy masala sweet corn chaatcorn cheese ballsMexican nachos with cheese dip and above all are kids favorite snacks 😍😋 which they never say NO to have it anytime 😀. 


Foodie Monday Blog Hop

Taking this  crispy and yummy capsicum rings recipe to  FoodieMondayBloghop fb group's #301Bellpeppercreations theme. By this time you are all aware that I am part of this lovely group where we bloggers share recipe for theme suggested by a person in alphabetical order every week. This week theme was suggested by "Preethi" who blogs at "Preethicuisine". I love her recipes a lot, all her recipes are very healthy and tasty. I shared her recent palkova recipe to try soon, who d't like this milk sweet desert? do check out her recipe. 


                                    Capsicum Rings 

Preparation time - 10 minutes
cook time : 15 min
Serves : 20 capsicum rings 
Category : snacks/ fritters  
Recipe Cuisine: Indian
Main ingredients : capsicum
Author : Aruna SarasChandra

Ingredients

Capsicum - 2 medium size
rice flour - 1/2 cup
corn flour - 1/4 cup
bread crumbs(video) - 1/2 cup
mixed herbs - 1/2 tsp
oregano - 1/2 tsp
piri piri mix - 1/2 tsp
red chilli powder - 1/2 tsp(adjust)
baking soda - 1/2 pinch
salt - as per taste
oil - to deep fry

Instructions

1) Take rice flour, corn flour, red chilli powder, mixed herbs, oregano, peri peri mix, red chilli powder, salt in a wide mixing bowl.

2) Add some water and prepare thick batter, add water little by little and mix well without forming any lumps and keep it aside.

3) Heat oil to deep fry on low flames.

4)Cut capsicum heads and cut into rings, cut out seeds and white pulp in middle of capsicum and keep it aside.

5) Now add cooking soda in batter and mix well. 

6) check oil heat by dropping some batter in oil, if it comes up immediately that means our oil is ready to fry.

7) Now dip capsicum rings in batter, later coat these rings in bread crumbs and keep it in plate.

8) Repeat the same for some capsicum rings and then fry it in oil on low to medium flames till it changes color and then take it into plate.

9) Repeat the same for remaining and take into plate.

That's it our capsicum rings are ready, serve it with tomato ketchup or with any dips like cheese dip or with any salsa and enjoy with your friends and family. 


Tips 

** Instead of rice flour and corn flour we can use all purpose flour. Other than these flours if you use gram flour you do not get this texture and taste. 

** If Italian seasonings not available you can simply skip it. 

** Prepare semi thick batter so that capsicum ring coat in batter well.

** Instead of bread crumbs you can also corn crumbs.

** Fry capsicum rings in low to medium flames without burning till it changes color. 

** You can also sprinkle some chaat masala on capsicum rings.


Also check other related recipes from blog and youtube  channel by just clicking the link below pic.. 

                                          gobi pakoda/ cauliflower fritters


                                     Uggani bajji

                                       
                           Rayalseema Pugyalu / onion bajji
                      
                                                      Ribbon Murukku
                    

                                     Crispy chilli honey potato
                           
                              Potato Lollipops(youtube video link)

                                         
                                    corn cheese balls


                                  Baby corn manchurian


                              Baby corn fritters

Hope you like this crispy and tasty capsicum rings .Give it a try and drop your comments in inbox.

Do subscribe my youtube channel Vasus vegkitchen

Also follow me on 

In facebook @Facebook
In Pinterest @pintrest
In Instagram @Instagram Also drop your feedback 🤗😍.
In Indiblogger


Thanks for visiting my blog,
Aruna Saraschandra :) 

Sunday 26 April 2020

Poha Chivda || అటుకుల మిక్చర్ || how to prepare poha chivda in 15 minutes

Poha chivda || అటుకుల మిక్చర్  || poha mixture with detailed video and tips. Hai friends how are you all ? hope you are all safe and healthy. Poha chivda is very crispy, tasty and healthy snack prepared by adding different nuts. We have 2 different varieties of poha - thick & thin, today i am preparing chivda using thin poha. We can also prepare chivda using thick by deep frying, i will share that recipe soon. Coming to our thin poha chivda, i used almonds, cashews and raisins to make to more healthy. We can store this poha chivda fresh more than a month when it is stored in airtight container. In this lockdown period everyone staying at home and craving for snack all time. We can prepare this poha in 15 minutes easily, there are many varieties of poha chivda today i am sharing the one which i prepare regularly. Green chillies added in it are fried well, i added saunf which enhances its taste, you can skip it.


Taking this healthy poha chivda recipe to FoodieMondayBloghop fb groups #244SnackMania theme. Here each blogger will gets chance to suggest theme according to alphabetic order. That member will suggest 2 themes, other members will vote it, the one with more votes will be selected for theme. Today's theme was suggested by Renu, she suggested us to share any snacks fried or non fried that can be stored for minimum 15 days. Check out Renu's place for tasty and healthy recipes. I bookmarked Renu's sprouted wheat flour bread , paush bada, sprouted wheat flour no knead bread recipes to try it soon.Do check her space, you will love it.                                                                              


                                                         Poha Chivda 

cook Time : 15 minutes
Serves : 300 gms 
Category : snacks
Recipe Cuisine: Indian 
Main ingredients : thin poha 
Author : Aruna SarasChandra


Ingredients

thin poha - 200gms
oil - 4 tsp
groundnuts - 2 tsp
roasted chana dal / putnalu - 2tsp
dry coconut slices - 2 tsp
cashew nuts - 12
almonds - 12
raisins / kismis - 12g
green chilli - 4
red chilli - 4
curry leaves -1 sprig
turmeric powder - 1/4 tsp
mustard seeds - 1/2 tsp
cumin seeds - 1 tsp
fennels seeds - 1 tsp /saunf - 1 tsp(optional)
salt as per taste
sugar - 1 tsp(optional)
hing - 1 pinch

Instructions

1) Dry fry poha for a minute and take it into plate.

2) Heat oil in a pan, add groundnuts fry it, when it starts changing color add roasted chana dal fry for few seconds.

3) then add cashews, almonds, raisins, fry well.

4)now add green chillies, red chillies fry it well. Then add mustard, cumin and fennel seeds fry well. Later add  curry leaves, turmeric powder, salt fry everything well.

5) Switch off the flames and add fried poha and saute everything well.

6)At last add sugar, saute everything well. Let the chivda cool completely.

our chivda is ready store it in airtight container, this will stay fresh and crispy more than a month.

  
Tips

** Do not burn poha, just fry till it becomes crisp or for a minute.

** Fry all nuts and tempering on low to medium flames, do not burn it.

** Adding saunf / fennel seeds is optional but it gives good taste to chivda.

** You can skip sugar or you can add sugar powder instead of sugar.

** Do not store poha when it is hot, let it cool completely then store it. 

** Store it in dry and airtight container only.

Also check other snack recipes by just clicking the link below pic..

                     
                                dalmoth namkeen

                   
                                 Omapodi || karapusa || sev


                                                  spicy masala peanuts
   
                                   
                                  JackFruit seeds Vada


                                      Paneer pinwheels

                                        Pepper sev


                                         Corn flakes chivda

Hope you like crunchy, tasty and travel friendly snack poha chivda recipe . Give it a try and drop your comments and pics in inbox.

Also follow me on
In facebook @Facebook
In pintrest @pintrest
In Instagram @Instagram Also drop your feedback 🤗😍.

You can also search recipe
in MyTaste

Thanks for visiting my blog,
Aruna Saraschandra 😊.

Monday 6 April 2020

Garlic Paratha || Garlic lachha paratha

Garlic Paratha || Garlic lachha paratha with step by step pics and tips.How are you all doing friends?? stay home, stay hygiene and eat healthy food that increase your immunity system. Using garlic regularly will boost our immune system, use it in any way in your diet. Though i am not big fan  of garlic i try to have it some way. Garlic paratha are Indian flat breads prepared using wheat flour and crushed garlic and other spices in butter. This is very tasty, flaky, layered with strong flavors of garlic and other spices masalas. 


We can have this parathas as it is, i had this with Dum aloo, onions and lemon. We can also prepare this using maida, today i used whole wheat flour. Lachha paratha  is one of the popular Indian flat bread that everyone loves it. 


Taking this recipe to Foodie Monday Blog Hop fb group's #241FlatBreadFiesta theme.This week theme was suggested by Poonam Bachhav. She is a wonderful and talented chef i love photography and presentation skills mainly her dedication. Check out her space for different varieties of recipes from different regions. I bookmarked Poonam's pudina lachha parathaamritsari aloo kulcha to try soon. This week poonam suggested us to prepare any flatbread recipes, so i chose this garlic paratha. 


                                 Garlic Paratha 

Preparation time - 20 minutes
cook Time : 15 minutes
Serves : 6 parathas
Category :Roti / Paratha / breakfast 
Recipe Cuisine: Indian 
Main ingredients : garlic, wheat flour
Author : Aruna SarasChandra


Ingredients

To prepare dough

wheat flour - 2 cups 
sugar - 1/2 tsp
salt - as per taste
oil - 2 tsp

To prepare garlic masala

butter - 3 to 4 tsp
garlic cloves - 10 
coriander leaves - 2 tsp(finely chopped)
red chilli flakes - 1 tsp
cumin powder - 1/4 tsp(optional)
pepper powder - 1/4 tsp

others

wheat flour - 1/2 cup
oil - 1/2 cup

Instruction

1) Take wheat flour in a wide bowl add salt, sugar, 1 tsp of oil mix it well. Now by sprinkling water prepare smooth dough apply oil on dough and rest it for 20 to 30 min by closing lid or cloth.


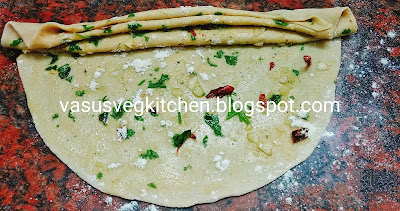
2) take butter in a cup, let it melt. Now add finely chopped and lightly crushed garlic, coriander leaves, red chilli flakes, cumin and pepper powder mix it well.


3) Divide dough into 6 equal portions, roll it in thin round shape. Spread butter garlic masala on roti, spread atta on it. 


4) Roll roti like fan and expand it. Now start rolling it both side and press it both as shown below.


5) Prepare the same for remaining portions.


6) Dust floor then press above dough with fingers and roll it thick roti.


7) Heat pan place roti carefully, heat both side till you get brown spots then apply oil. Fry both sides till you get brown spots both sides then take it into plate. Repeat the same for remaining.


That's it flaky, tasty and aromatic garlic paratha with many layers are ready to serve.


Also check other related recipes just by clicking the link below pic..

       
                           Lachha paratha

                               
                               Adai/Mixed lentils dosa

                   
                                 Ragi Mungaaku rotte


        Sweet Coconut paratha


Hope you like this healthy,tasty and aromatic Indian flatbread - Garlic paratha. Give it a try and drop your comments and pics in inbox.

Also follow me on

In facebook @Facebook
In pintrest @pintrest
In Instagram @Instagram
Also drop your feedback 🤗😍.

You can also search recipe in BetterButter

in Indiblogger
in MyTaste


Thanks for visiting my blog,
ArunaSaraschandra 😄